In the next few months, I am going to port ZurmoCRM onto QNAP. I might need to test different configuration and need to reinstall QTS several times. Remove the hard disk and use SATA to USB bridge to kill partition takes too much time. Instead, you may SSH to login, then clean QTS partition with dd. or remove with fdisk.
Login to QNAP with SSH
ssh-keygen -R 10.42.0.12 -f /home/amigo/.ssh/known_hosts
Remove RSA key for 10.42.0.12 if necessary. Please use your NAS IP to replace 10.42.0.12, and user home directory for /home/amigo.
ssh admin@10.42.0.12
Login to 10.42.0.12 as admin which is the same as your web admin account and password.
Fill Null to Disk
df
List of free disk of mounted device to identify the device name of your hard drive in NAS.
dd if=/dev/zero of=/dev/sda bs=10M count=10
/dev/zero is a special file with null characters only. Used as source as a character stream for initializing data storage.
bs=10M means read and write up to 10M bytes at a time.
count=10 means repeat for 10 input blocks.
It will write 10M * 10 data to the beginning of /dev/sda which shall destroy QTS.
Then reboot with reboot command. Now, it shall reinstall QTS firmware automatically.
If you are using RAID 1, you need to use above command on /dev/sda and /dev/sdb before reboot. If you remove just one of them, it will automatically recover from another disk. That’s how RAID 1 works.
Remove QTS Partition and Keep Data
There is an alternative and better solution to keep your data which stores in another partition. Instead of dd, use fdisk to work on partition directly.
First to check what is available in disk. Here is a sample executing fdisk -p /dev/sda from my QNAP TS-112.
[/sbin] # fdisk -p /dev/sda

Disk /dev/sda: 2000.3 GB, 2000398934016 bytes
255 heads, 63 sectors/track, 243201 cylinders
Units = cylinders of 16065 * 512 = 8225280 bytes

   Device Boot      Start         End      Blocks   Id  System
/dev/sda1               1          66      530125   83  Linux
/dev/sda2              67         132      530142   83  Linux
/dev/sda3             133      243138  1951945693   83  Linux
/dev/sda4          243139      243200      498012   83  Linux
-p to display partition in a disk.
/dev/sda is the disk name.
Then delete QTS partition by executing fdisk -d 1 /dev/sda.
[/sbin] # fdisk -d 1 /dev/sda
The partition table has been altered!

Calling ioctl() to re-read partition table.

WARNING: Re-reading the partition table failed with error 16: Device or resource busy.
The kernel still uses the old table.
The new table will be used at the next reboot.
Syncing disks.
-d 1 to delete the first partition.
/dev/sda is the disk name.
Then reboot with reboot command. After reboot, it will prompt to install QTS firmware. Choose [Manual Setup], and click on [Configure disks later] in [Disk] step. It will automaticall to apply settings and reboot.
After reboot, login to QNAP device, re-enable [Microsoft Networking]. Now, you may see your data in the same folder before re-install QTS.
Update on 2017/6/15 QTS 4.3 Has Build-In Reinitialize NAS
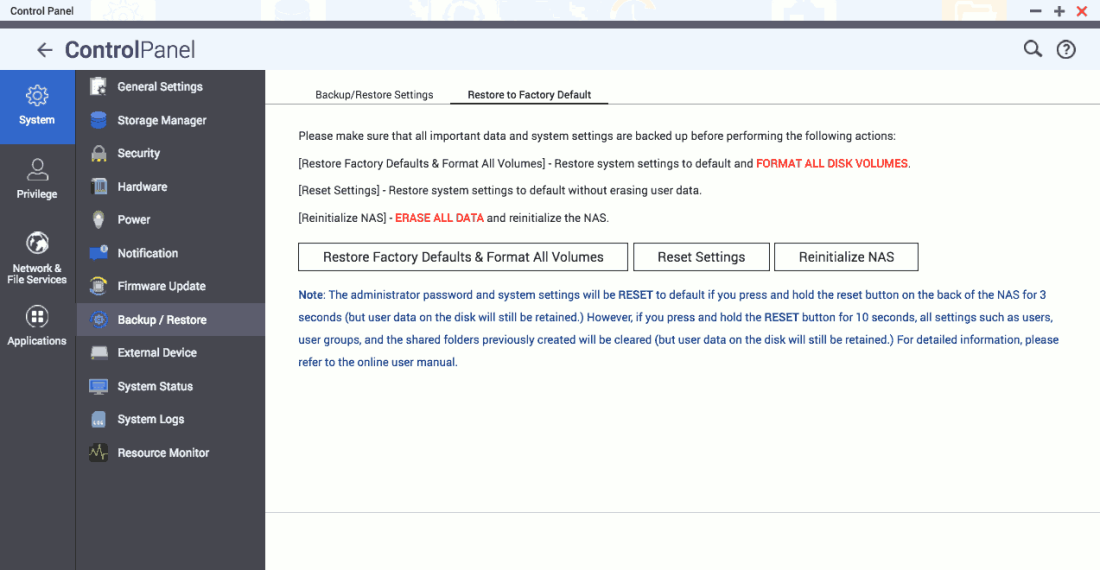
I found a there is a quick reset button in [Control Panel] → [System] → [Backup / Restore] → [Restore to Factory Default] tab on my TS-251A running QTS 4.3. I can reinitialize with [Reinitialize NAS] button.
If I want to use the same way to destroy firmware by filling zero, download applications and application configurations will be destroyed but all user accounts and QTS are kept. In other word, you cannot reinitialize QTS 4.3 this way.
[~] # fdisk -p /dev/sda

Disk /dev/sda: 500.1 GB, 500107862016 bytes
255 heads, 63 sectors/track, 60801 cylinders
Units = cylinders of 16065 * 512 = 8225280 bytes

   Device Boot      Start         End      Blocks   Id  System
/dev/sda1               1       60802   488386583+  ee  EFI GPT
[~] # dd if=/dev/zero of=/dev/sda1 bs=10M count=10
10+0 records in
10+0 records out
104857600 bytes (100.0MB) copied, 0.140631 seconds, 711.1MB/s
[~] # reboot
[Reset Settings] will restore admin account to default and delete all other accounts. It also delete all downloaded applications but keep application configurations and application accounts. I have test with Virtualization Station. Everything is back after reinstall. Some applications will overwrite existing configurations and accounts but this is another story. You need to login with default admin password. No need to reinitialize QTS.
[Reinitialize NAS] kills everything including application configurations and user data. You need to reinitialize QTS.

hey. i’ve got interesting situation with ts-212. after system upgrade i can’t connect to admin web management. there was HTTP 503 error or never ending redirect. i use your tip and i use dd by ssh to overwrite data on disk. after that (after reboot) i can connect by http to web management. data on disk in 100% ok. every settings saved. cheers 😉
LikeLike
What a super star and a genius!!!
Wanted to reuse a WD RED 6tb hard drive – which I had previously installed in QNAP NAS and then needed to use it in a Synology. All I had to do was delete/overwrite the QNAP partition (with NULLS) so as Synology could initialise/format the drive. No need for PC tools or HDD to USB case/adaptor.
This post solved the problem. Thank you!!!!!!
LikeLike